1 Mastering git
❯ Level 1
What are git and github?
The first step in this journey is to understand what git and github are. First of all, git is a version tracking software, particularly used to track versions of a codebase. Fundamentally, it is just a tool that keeps in memory versions of a set of files. You could say it is a more powerful version of programs like the Apple Time Machine, or even the history of versions in Google Docs or Overleaf. The difference and difficulty with git, is that it gives you the full control of what you are willing to keep as a version, and even the possibility to keep parallel conflicting versions of your set of files. Briefly, it was developed by the Linux kernel team and notably Linus Torvalds to keep track of the development of Linux, and has become the standard to manage versions of codebases across the industry and open-source communities, now being a prerequisite for virtually any job in software development.
Github, on the other hand, is simply a website where git repositories are stored. Together with git, it provides a wonderful way for developers both to work together on complex projects without having to send each other bits of code via mail (a practice that I have still seen very often in labs), but also a way to backup code even if you are working alone. Its features and freemium model have made it very popular but there are strong alternatives like gitlab.
What are the principles of git?
In few words, git keeps a tree of versions of a directory of files, each version being called a commit. At any point in time, you can go back to any commit, and restore all the files of the directory to the state they were back then. This is particularly interesting for a researcher, as you can have made experiments or simulations in the past that you are unable to reproduce several months later if your whole code has changed: with git you will be able to go back to the time when you made those experiments, reproduce the results, and hopefully understand what has changed. It is also particularly interesting for developers, as when a bug is found, one will be able to find a version where it didn’t happen, or simply revert changes that introduced undesired behavior.
A nice feature of the tree structure of commits, is that one can have two divergent, coexisting versions of the codebase, in different branches, and switch between them, which allows teams of developers to work in parallel on the different features without interfering with one another. Contrarily to trees in our nature though, branches can merge back again into one, thus bringing features that have been developed in parallel together into a single codebase.
Finally, git is a distributed version control system, which means that each developer has a full copy of the repository on their computer, while being able to synchronize it with a remote repository. This is particularly useful for researchers, who can collaborate on a common project, and yet keep working on it offline, even for several days, while their colleagues can work on other parts of the same project. Once they are back online, they can synchronize their changes with the remote repository, and merge them with the changes made by their colleagues.
Let’s get started: create a git repository locally
A first step is to use the git software itself, without github or other external services. Let’s start by making sure git is installed on your computer: you can follow instructions for example here
Now, you can convert any directory on your computer into a git repository, by going in that directory with the terminal and running the command:
git init Concretely, this will simply create a hidden directory inside of your directory, called .git, in which special files will store the whole history of your project. For now, it is empty, but in the next paragraph we will start populating it.
Note that you could make use of git like this, only on your computer, and in that case its purpose would simply be to keep track of the changes made to your files, although most people do use git in conjunction with a remote repository.
Creating a git repository online
If you want to use github, you need to also create a repository directly on github and then connect it to your local repository. For the first part, you can follow github’s instructions here.
You can then connect it to your local repository with the command:
git remote add origin <github_url> where the url can be found in the green “Code” button on your repository’s page.
Let’s unpack what happens: there you say to your local git repository that it should have a “remote” (which is like a mirror version that will be online), that this remote will be called “origin” (usually you will only have one remote, and “origin” is the typical name, but having several is possible), and that it is at the given URL.
Another solution is to first create the repository on github, and then clone it on your computer with the command:
git clone <github_url>which will create the directory, and add the remote in one go.
You might need to solve some github authentication issues, which is not always as trivial as one would like. The simplest nowadays is to use the personal access token method, but there is also an ssh method. There is a great guide here that should do the trick, and a paragraph in level 3 with more details.
Congratulations! You now have a directory in your computer that is tracked by git, and will be mirrored by a github repository. Now, we will learn how to save versions of your files, and synchronize them with the online repository.
What is a commit?
When we say git stores a history of your project, it means it stores “snapshots” of the project at different points in time. Formally, a commit is just that, a snapshot of your project’s directory, at a certain moment, that you can restore when you want. Each commit is identified not only by a date and time, but by an alphanumeric code (called tha hash), by an author, and by a message (that is supposed to explain what was new in this commit).
The catch is that contrarily to tools like Time Machine, Google Docs, or Overleaf, git allows - and requires - you to choose when to take a snapshot, and what to put in it (for example you may choose to commit only a certain file). This what makes git both incredibly powerful, and incredibly confusing for newcomers.
In other words, git is not going to save a version of all your files every time you save them, or every day. It is only going to save a version when you explicitly tell it to, and only for the files you specify. The fact that it has to be done manually is why it will take some time to get used to git, but once you get it, you will see that it can be done very quickly and without thinking too much. The fact that you choose when and what to version will make it much easier to then navigate through the history of your project.
Add-commit-push: the 3 magical commands
In this paragraph we will see the core commands of git: add, commit and push, that allow you to create new “versions” (aka commits) of your codebase, and synchronize with the remote. There are two difficulties: the process is cumbersome, and the names are terrible. Let’s focus on understanding visually what happens.
Go to your empty repository and add a file named hello.txt with some text in it. Now, run:
git statusThis command will tell you the state of your files in the git repository. You will see that hello.txt is an “untracked file”. This means that git never took a snapshot of it. If you loose it, you will never be able to recover it!
Now, run:
git add hello.textThis command will put hello.txt in the “staging area” or “index”, as you can see if you run git status again. This is a place where files are put before being saved in a commit. It is like a “temporary commit”. These files are not yet saved for ever. The existence of this staging area is one of the complications of git. It exists to allow you to be really sure of what you want to put in a commit before saving it.
Now, you can run the following:
git commit -m "Added hello.txt"This command will create a new commit, with its unique hash, you as an author (you will see git may ask you to confirm your name and email by the way), and the message “Added hello.txt”. This commit contains the directory as it is now, with the file hello.txt, and is now saved forever in the history of your project. You can see it by running:
git logThat lists the commit from the most recent to the oldest. You will see your last commit.
But this commit has not yet been synchronized with github, as git status will report! (One commit ahead of origin/main). To do this, run:
git pushAnd you will see that github is now aware of your last commit and of the file hello.txt.
Subtelties of the staging area
The little spicy thing of this process is that there can be files in your working directory that are not staged, and hence won’t be added to the commit, and you can even have a file that is in a different state in the staging area, and in the working directory! This would happen if you run git add hello.txt, and then modify hello.txt again. If you want these last changes to be committed, you need to run git add hello.txt again. This is a bit confusing, but it allows you to be very precise in what you commit.
So far we have shown how to add files one by one, but you can run git add . to add all files (both modified and unstaged). There are certain categories of files that you will never want to add or commit (for example big datasets, images sometimes, binaries, etc.). You can create a .gitignore file in your repository, and all files matching a pattern listed in it won’t be added with git add . (but you can still force-add them with git add <filename>).
Since the purpose of the staging area is to prepare the commit, you might wonder how to remove a file from this area if you don’t want to commit it after all. With git unstage? No, that would be easy! Erk! It’s with git reset -- <filename> (the -- is important), or the equivalent git restore --staged <filename>. To make things even more fun, git reset has a bunch of other uses we will see later.
And what if you wanted to un-commit a file? Well, that’s precisely what git is designed to avoid: the commit should be there forever. The simplest way around is to simply add a new commit that un-does your mistake. There are more advanced ways we will see in the other levels, like rewriting a history or using amend.
How to git pull
A key objective of git is to allow collaboration. If you are working alone, the above commands are enough, but if collaborators are also working on the project, they will also add commits to the github version of the repository, and you will need to sync them back to your local version. To simulate this situation, go to your github repository, click on hello.txt, then the pencil button in the top right, add some text, and commit the change through the window that appears (this simulates the whole add-commit-push process from the github interface). Now the github version is one commit ahead of your local version. To sync them, you can run:
git pullAnd you will see that the file hello.txt is now updated in your local version. Moreover if you run git log, you will see the new commit in your local commit history. Thus, git pull has done two things: it has added the new commit on your local history of commits, and it has updated your local directory to the state of the last commit.
What if you add a commit locally, and someone else adds a commit on github, and you run git pull? Well, then git will try to do what is called a “merge” [link]. If the two commits are on different files, it will automatically handle the situation for you by adding an additional commit that merges the online and local changes. If the two commits are conflicting, you will need to learn about merge conflicts in level 2, but by the time you arrive there you will know how to never be in that situation ;).
Finally, if you push your recent commit and someone else pushed a commit online in the meantime, github will refuse your push. Your history should match that of github before you can push. You will need to run git pull first and then git push.
Add-commit-push in VSCode
The process is cumbersome enough, and having to memorize command lines, as well as doing regular calls to git status to check in which stage each file is can make it very confusing. Fortunately, numerous graphical tools have been developed to make it easier to visually grasp what is going on and commit your code. Some of these tools are specialized to this task like GitKraken, and some are integrated in IDEs: for example PyCharm and VSCode have one, and they can be enhanced with extensions. In particular, I can recommend you to install the GitLens and GitGraph extensions for VSCode. Opening your repository in git, you will notice a bit of git everywhere:
- in the sidebar, you have a little branching icon. Clicking it opens the git functionalities.
- in the lower status bar, you should see your branch name, that is clickable, and the sync item. This will allow you to push and pull, and change branches, more on this later.
- If you have a file opened, above its contents you should see an indication of who modified this file last and when. Clicking it opens the “git blame” view, which allows you to see who modified each line for the last time and in which commit. This will be very handy! More on this later on.
- Finally, always with a file open, on the explorer sidebar, you should see a “Timeline” section containing all commits that modified the open file. Clicking any of these commits will open a “diff view” showing the changes brought to the current file in that commit.
Let’s focus on the git sidebar and see how to commit our code without the terminal. The main section we will focus on right now is the “Source control” one. Modify one of the project’s file, save your changes, and you will see its name appear in the list of “Changes” in that section. Clicking the name of the changed file will open a diff view with respect to its version in the latest commit, which is very useful if you want to check your changes. Now, to commit this change into your repository, you should do the three stages (add, commit, and push). For the first stage, you can click on the plus sign that appears when you hover over the name of the file. Note that there is also an option to “checkout” the file, which means discarding your changes and restoring the version of the latest commit (this is irreversible). Once the file is added, it will appear as a “Staged change”: it is now in the staging area aka the index. To commit, you can write a little commit message in the box above and click commit. Notice that by clicking on the arrow on this button you can “commit & push” which will be more practical most times as these operations make sense together. If you separate them though, you can always push by clicking on the three points next to the “Source control” section title, or the sync button in the status bar (that will be modified to indicate that you have one more commit that is not yet online). The same buttons can be used to pull changes from the online repository.
Level 1 cheat sheet:
Vocabulary:
repository: directory with a history of versions of its files (with git, stored in the .git directory)
commit: version of the directory to which one can come back at any time.
remote: online mirror of a local repository
Commands:
git init   \# convert a local directory into a repository
git remote add origin \<github\_url\>  \# setup your directory to track an online remote
git status
git add \<files\>
git commit \[-m "did that"\]
git push
git pull
❯❯ Level 2
Create branches
Without branches, we would just have a single monotonic history of modifications of a project, like it happens in most systems with a history of changes like Google Docs or Overleaf. That’s already very useful, but in several cases one might want to split the project:
- for example if you want to try an experimental feature that might take you weeks to complete and that you are unsure you will keep in the end,
- or if your work is changing files other people rely on, and you don’t want them to suffer your changes until you are completely done
Creating a branch in git allows you to split the history in two concurrent, simultaneous histories, that can later be merged.
These are the commands you need to know:
# Create a new branch named new-branch
git branch new-branch

# Move to the branch named new-branch
git checkout new-branch

# Just list all available branches and see which one you are on
git branch

# Shortcut to create and checkout to a new branch
git checkout \-b new-branch
Note that all projects start with a “master” or “main” branch that is supposed to represent the most stable version of your code. You can try to create a new branch, add a commit, then checkout to “master”: then the changes brought by your last commit will not be visible anymore, those can only be seen when on top of the new-branch. If on top of master you now add a second commit, those two will not be on top of one another but siblings: they add different changes on top of the same project state.
To visualize what you have done, one can use a visualizer like the VSCode extension “Git Graph” or use the following command:
git log --oneline --decorate --graph --all (I suggest even to make it an alias with git config alias.logg ‘log --oneline --decorate --graph --all’, that way you can use git logg to do the above) Both techniques should give you a clear picture of the two commits branching out from the same one.
Finally, let’s push this branch to github. If you move back to the new branch and do “git push”, you will see that it doesn’t quite work, but git is nice for once and the message you get will give you the correct way to do it:
git push -–set-upstream origin new-branch Do a merge
Having lots of children is not the goal of a git project though, and of course your project would be unmanageable if every idea just branched out without ever forming a coherent whole. We want ultimately merge branches back into the “master” or “main” one once we are confident they bring useful changes. To do this, you can go to the master branch (or any branch you want to merge into) and run this command:
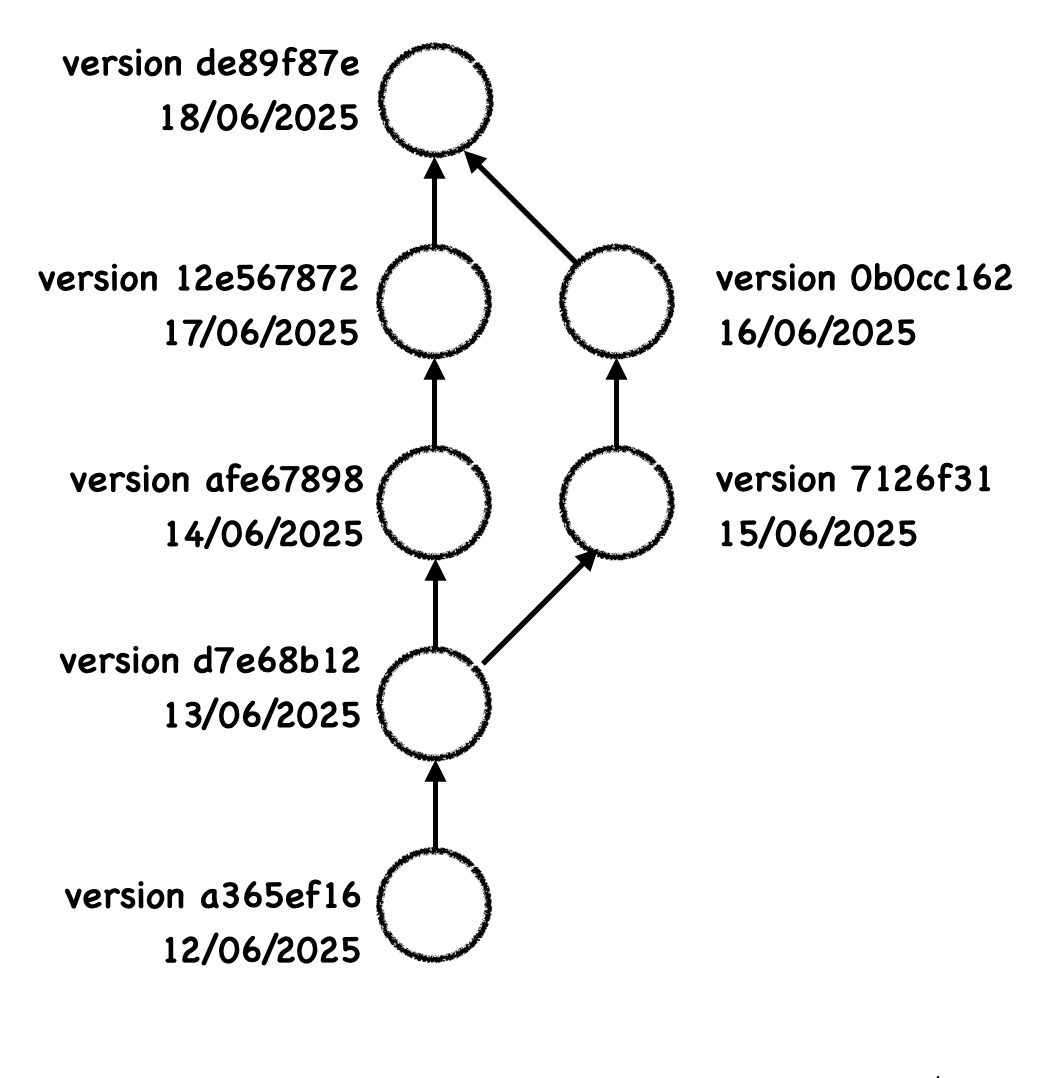
git merge other-branch Where “other-branch” is of course the name of the other branch you are merging (no need to specify the branch we are merging into, it is simply the one we are on when calling this command). In the best case, different files are modified in both branches, and git will do all the work and simply add a new commit (with two parents, the last commits of both merged branches). In the tree it looks like this:
[IMAGE]
The two branches now point to the same merge commit, but in practice you likely won’t need “other-branch” anymore and can delete it with git branch -D other-branch.
If the same files are modified by both branches, either changes are on clearly different parts of the file and git might handle that itself (but it is rare), or you will have to work through the dreaded MERGE CONFLICT RESOLUTION (cue thunder noise).
Solve a merge conflict
VSCode offers a practical tool that I recommend in this case if you are not sure what you are doing (details here). The concepts are simple, but again the git terminology does not always help. For each conflicting part of a file, we can either choose the version in the branch we are merging INTO, named “current” or “ours” in git parlance, or the version in the other branch, named “incoming” or “theirs”, or even write a new version. You can see the two versions in the VSCode merge tool but in reality git itself has modified the conflicting files, to add the “current” version between lines \<\<\<\<\<\<\< HEAD and ======= and the “incoming” version between \>\>\>\>\>\>\> other-branch. If you want to work directly on the file, you should just make sure to remove those lines and edit what’s between them to keep a coherent single version. If you are using VSCode, with the 3-way editor you can simply choose to keep one or the other version (left or right) and then edit the resulting file (bottom) until you are satisfied.
Once all conflicts are fixed, remember to add the fixed files with git add, then you can simply run git commit to actually obtain the merge commit (the message will already be filled automatically).
The git branching workflow
Branches give you an under-estimated power: the power to commit any half-baked, buggy code you are working on, without fearing to have it forever in your project or having to painstakingly remove it. Just commit it to a branch, if it never ends up working, you’ll be able to forget the branch, if it does you can merge it when you are happy. This is why, to avoid having bad commits on the main project history, and still be able to track all your work, even failed attempts, it is recommended to create a new branch every time you want to add a new thing or fix a bug. Sometimes this branch will be merged very quickly into main, sometimes you will be working on it on-and-off for months, but the great thing is you don’t need to stress yourself, you will just merge when you are ready!
Note that if you merge into main, you might make mistakes while fixing conflicts that you don’t want to see in the main branch. Also, we won’t really be merging into main locally, but rather through a pull request (section below). So the real workflow looks like this:
- You have an idea for a cool feature that you want to add. You will thus create a new branch.
- Make sure you are on the master/main branch and up to date:
git checkout masterandgit pull.
- Create and checkout to a new branch “cool_feature”:
git checkout -b cool_feature.
- Implement it!
- Make sure you are on the master/main branch and up to date:
- Your feature works well, you are very happy and want to bring it to your collaborators. You will not merge directly on main though, but merge main into your branch in order to fix conflicts and make sure they don’t break your feature first. For this:
- Go back onto master and make sure it’s up-to-date:
git checkout masterandgit pull.
- Go back to your branch and start the merge:
git checkout cool_featureandgit merge master.
- Fix conflicts, and then run
git add,git commitif there are any.
- Run
git pushin all cases (need to push the merge commit).
- Make sure the fixing was good and everything still works.
- Go back onto master and make sure it’s up-to-date:
- You will finally be able to now merge cool_feature into main, usually directly from github with a “Pull Request” (see below).
File a PR
In the above we have done the merge locally, but to merge into main it is recommended to do it directly on github via a “pull request”. Github will actually offer it in the repo’s page after you pushed to a branch, and if you don’t see it you can always go to “Pull Requests” and create a new one. The concept is that you will ask the “main” branch on github to merge the changes of another branch (so it should rather be called a “merge request” if words weren’t semi-random in the git universe, and this is what gitlab calls this by the way).
All instructions on how to do it are clearly detailed here. In general, when working in a team, you will ask another team mate to have a look at your PR, review it, if necessary ask for changes, and once everyone is happy it can be merged. Note that there are different ways of merging: “Merge pull request” is the simplest and equivalent to doing a git merge other-branch from the main branch. We will see “squash and merge” [here] and “rebase and merge” [here]. Of course it can slow the review process, but it allows everyone to be more confident about the code remaining consistent, and makes other teammates aware of what you are changing. Plus, if your code is open-source, external people can also file PRs and suggest interesting changes!
If your team is very small, doing the whole review process can be a burden, but there is still some value in doing PRs, since as we will see later it allows to implement automated tests via CI/CD that ensure your changes don’t break functionality, and it also prevents people from modifying main locally at the same time and then having to do some merging kung-fu to save the day that bloats the main branch. If you are completely alone :’(, then just merging into main should be really fine.
Use git blame
Whether we are reading a file in your codebase and don’t understand why or when a line was added, or are trying to understand which change brought a certain bug, git has you covered. git blame is, despite its passive-aggressive name, one of your best git friends. It’s much simpler to use in VSCode though so let’s start with this: for this, one possibility is to install the GitLens extension (that contains some free and some paid features), and you should then see if you open any folder that is git-tracked and then a file inside, that lines will end you a very dim grey comment containing the author and date of the last modification of this line. If you don’t, use the command palette and search for “GitLens: Toggle Line Blame”. Similarly, “GitLens: Toggle File Blame” will show blocks on the left of the code with last modification information for each line. To do something similar in the command line, you can run:
git blame <filename>

# or to see only a certain range of lines
git blame -L 10,20 <filename>

# or the equivalent
git blame -L 10,+10 <filename>
Finally, what’s less known is that to get the whole history of commits modifying a file or a line, you can simply run:
git log <filename>
# for a single line

# or to see only the commits that modified a certain range of lines
git log -L 10,20:<filename>
# (add -s to not show the associated diffs)
The stash
Sometimes you will try to do a checkout or a pull, and you have modified local files that are tracked but didn’t commit them, and that’s a problem, because pull, checkout or merge will be changing all the tracked files in your directory to reflect those of another commit. The best in that case is to commit them, but if you really don’t want to do it right now because you are in a bad hurry, git offers a “stash”, which is basically that dirty corner of a desk that everyone has.
In the dirty corner, you can put stuff you want to deal with later ON TOP of the pile of stuff that’s already there. When you want to come back to it, you can pick whatever is on top of that corner and bring it back to your working space. The stash is the same. To add something onto it run:
git stashand all the current modifications to tracked files in your working directory are put on top of the stash. You can then run git checkout for example, do your work, and once you are done you can run:
git stash popand those modifications will be brought back to your working directory (if they don’t create conflicts of course). If there are various items in the stash, they will be brought back in the “last one in gets out first” order, like a literal pile. You can also see what’s in the stash with git stash list or and remove items from the stash with git stash drop or git stash clear to remove everything. This “last in first out” behavior can seem annoying but it’s also made to be used only for emergencies and for a short time, if there are really multiple things on the stash you should probably rething your process.
❯❯❯ Level 3
Use git rebase
This is the most useful of the less basic git commands. It can allow to completely rewrite the history of a repository with an interactive rebase, that we will see in level 3, but in this paragraph we will focus on its most simple use: moving the base of a branch.
Say we have a branch cool_feature that we started developing from commit “abc1” as in the example below. At the same time as cool_feature was being developed, other work got merged into main, that advanced up to another commit “aef3”. The idea of a rebase is to move all the the commits of cool_feature as if they were children of the last commit on main “aef3”. To git it will then appear as though you started working on this after main was in its current state. To perform this, simply go to the branch you want to rebase (so cool_feature) and run:
git rebase main(where main is replaced by whichever branch you wanted to rebase onto).
How does git achieve this? Well, the details are not trivial but simply put, git will try to take the difference between “abc1” and the first commit in cool_feature, and then apply that to commit “aef3”, which will give a new first commit of the rebased cool_feature. It does the same for all commits of cool_feature until it obtains a line of commits that do the same changes as before, but starting from “aef3”. This has a few implications: first, if there is a change in main that interferes with one in cool_feature, then git will ask you to do a merge conflict resolution. You can try to handle it, or simply run git rebase --abort if it gets tricky and everything will be as before the rebase. There can be as many merges as there are commits in cool_feature if things are conflicting a lot!
Another implication is that the rebased branch will be a set of new commits, that do the same thing as before but they are also not the same snapshots as the old branch. They can have different bugs you did not foresee. Also, the commits of the old branch are kind of lost once the rebase is done (they can be recovered but with really complex techniques). So in that sense, rebase is one of the rare destructive operations in git and it can destruct versions that you thought were safe forever because they are in commits. It should hence be used with a lot of care.
Finally, last implication, you will notice that if you do a rebase locally on a branch that has a remote counterpart, and then run git push, it will fail. This is because the whole line of commits is now different, you are not simply adding a new commit on top of the ones the remote knows! The only solution is to run git push -f which is a “git push force”, and will replace the history of the remote branch with the new rebased line of commits. Push force can be extremely destructive and you should never ever do it on the main branch. There are many less dangerous ways to get an adrenaline shot. It should only be done on a feature branch, if you are rewriting its history and if it doesn’t disturb the flow for other team members.
Now the big question is why would anyone want to do this? Well, once the branch cool_feature has been rebased on main, merging it back into main will lead to a trivial merge (a case known as “fast-forward”) where it doesn’t appear as though there are concurrent commits in the history of main. Essentially, it allows the history of main to be “linear”, which allows for a more efficient use of git blame among other things. This is why github also offers you to “Rebase and merge” directly from a PR page (github will only let you try this if there are no conflicts).
Rewrite a history with rebase interactive
Quick fixes with amend
A use case that happens often is when you just hit the commit button and immediately go “dang I wanted to add that file too” or something similar. It’s no big deal of course, you can easily add a commit on top of the last one, or you could run a quick rebase -i HEAD^ as we saw above if you want a clean history but there is a much easier life hack.
Do the change you forgot, run git add, and then run:
git commit --amendThis will actually modify that last commit you had before. It will also give you a chance to modify the commit message unless you add the --no-edit flag. If you had already pushed that previous commit to the remote, you will now need to push force, because this is a form of history modification, so don’t do it on main or if someone is working on top of your commit.
Older quick fixes with fixup
Another similar situation is when you want to do a very simple edit on an earlier commit, like again a simple docstring change. Similarly, you can go through an interactive rebase, but the simpler life-hack is this: do your change, run git add, and then run:
git commit --fixup=<commit-hash>With the hash of the commit you want to modify. But this time it’s not so simple (wish it was!). This created a new commit on top of the last one, that is marked as a “fixup” commit. You can then run:
git rebase -i --autosquash <commit-hash>^(don’t forget the ^ to rebase on the parent of the commit you are fixing). You will see that this time the interactive rebase has already prepared the rebase plan to automatically put together the fixup commit and its target and smash them into a single commit. You can close the editor immediately and let it run. And again you’ll need to push force. A bit more cumbersome than amend but still quite fast once you get used to it.
Other features
I will finish with unordered interesting git commands you might want to check next: * git cherry-pick <commit-hash>: this is as simple as saying hi, it will just take the changes of a commit you specify and apply them on top of the commit you are currently on. Very useful if you want to cherry pick a commit that has very self-contained changes, like a new file or new function (and a good reason to have a clean commit history). * git bisect: this is an original way to find which commit introduced a bug. Basically you should write a script that quickly tells you if your bug is present, and then entering the git bisect mode will allow you to easily navigate your history by a binary search to find the commit that introduced the bug in only log(number of commits) steps. Very nerdy and honestly couldn’t find it useful in practice but cool way to impress a colleague or interviewer. * git reflog: remember when I said rebases were a way to destroy commits? Well, git reflog is your parachute if it goes wrong. Basically, a history of the commits HEAD has been onto is kept in a dark corner, and git reflog will show you that history. You can then checkout to any of these with a command like git checkout HEAD@{n} where n is the number of steps back you want to go, even if that commit is not on a branch anymore, or on a deleted branch. However, reflogs are not kept forever, and git has a garbage collector that will definitively remove them after a while (depending on some settings), so you have limited time to act (usually about a month), plus these are only local.
Resources
- The official resource is the git-scm website with its tutorial: https://git-scm.com/docs/gittutorial and the whole book if you have more time: https://git-scm.com/book/en/v2
- https://www.atlassian.com/git/tutorials: very comprehensive yet clear tutorials.
- https://learngitbranching.js.org/: great interactive tutorial to get some practice, highly recommended!